Manual Firmware Update / Downgrade
1.Open MTune and connect to the MaxxECU.
2.Go to Configuration --> Manual Firmware Update and click Manual firmware update…
3.Browse and select the desired firmware file (normally located in the MTune installation directory).
4.Follow the on-screen instructions and confirm.
5.Reboot the ECU after completion.
Important:
•Disconnect all high-current peripherals (e.g. fuel pumps, fans, NOS, etc.) before updating.
•Ensure stable supply voltage during the process.
If the update fails:
1.Reboot the ECU.
2.Restart MTune.
3.Repeat the manual firmware update procedure, even if offline. If the issue persists, contact support.
Note: Ensure the corresponding MTune version is available. Different MTune versions cannot coexist on the same computer.
Recovery procedure
If the Firmware update failed dialog appears, the update was interrupted - typically due to low battery voltage.
1.Restart the ECU and MTune.
2.Ensure stable power supply.
3.Navigate to Configuration --> Manual Firmware Update.
4.Browse and select the latest ECU firmware file, ensure the correct firmware file is selected to avoid flashing an incompatible version (dont select PDM firmware file here....)
5.Press OK and force flash.
Note: In virtually all interrupted update cases, the manual firmware update procedure restores the ECU. If necessary, repeat the process and restart MTune between attempts.
Manual ECU firmware update
Loads the selected firmware file to the ECU. Use only when explicitly instructed or when validating special/test firmware versions.
Manual ECU firmware update button
Can be used to update the ECU to an older ECU firmware, or a new (and BETA) version to be flashed into the ECU.
Set verification key button
Note: Only applies to the GEN2.
To enable firmware updates ≥ v1.160, a unique hardware key must be written once to the ECU, permanently authorizing future firmware updates without further internet connection or server verification, after which all updates can be performed locally in MTune using the standard procedure.
MaxxECU Hardware Key Provisioning Procedure
•To enable firmware updates ≥ v1.160, a unique hardware key must be written to the ECU.
•This procedure is required once per ECU.
•The key permanently authorizes the MaxxECU to run future firmware updates.
•After the hardware key has been installed once, no further internet connection or server verification is required. All future firmware updates can be performed locally in MTune, using the standard update procedure.
Online Method (Recommended)
Requires a stable ECU power supply and an active internet connection.
•Connect MTune to the ECU.
•Click Get Key online.
•The key retrieval and programming process is fully automatic, press Set Key.
Offline Method
Used if no internet connection is possible on the computer connected to the ECU not possible.
1.Copy the displayed ECU HWID.
2.Email the HWID to support@maxxecu.com
3.Await return of the generated hardware key.
4.Program the received key into the ECU as instructed.
Note: The hardware key installation is performed only once. After successful provisioning, firmware updates function offline without further verification.
Advanced options (hidden menu)
Note: Only available when show advanced development settings = yes.
Update bootloader + Update slave cpu
These options updates the MaxxECU Bootloader and the Slave CPU.
To update the Boot loader or Slave CPU, make sure that the ECU is powered and just press the corresponding button. No files need to be selected. The updates take about 2 seconds after which a message appears to indicate that the process is finished.
Note: These functions should ONLY be used when instructed, there is normally no need to do this and no gain to be had.
Downgrading note: Downgrading from a version 1.109 or above, to version 1.108 or below will corrupt the tune in the ECU. This is because 1.108 does not support the dynamic 4D tables that were added in 1.109. If you still want to do this downgrade, you need to have a tune-file saved from the old version and reload it after after the firmware downgrade.
Note: During a firmware update, connected peripherals (like MDash over bluetooth) might get confused and crash, please stop/remove all connected peripherals during a firmware update.
Test settings
Special settings that are used in MaxxECU firmware to "test" or modify the behavior of certain functions.
Setting |
Function |
testSetting1: 162 |
Porsche 996 2001 (ME 7.8) OEM CAN protocol, exclude ABS wheelspeed |
testSetting1: 6666 |
MaxxECU PRO CAN 1 <--> CAN 2 relay/filter feature (internal development) |
testSetting4: 1234 |
Mustang 2011 OEM CAN protocol (internal development) |
testSetting4: 2 |
Transmit the E92 DCT CAN protocol on PRO CAN2 instead of default CAN 1 (internal development) |
testSetting4: 321 |
Do not transmit the "alive" 0x321 CAN message |
testSetting1: 21022 |
Used to correct the PWM Module ID 1, which suffers from a faulty REV identification and reports wrong Amperage |
testSetting2: 21022 |
Used to correct the PWM Module ID 2, which suffers from a faulty REV identification and reports wrong Amperage |
testSetting3: 21022 |
Used to correct the PWM Module ID 3, which suffers from a faulty REV identification and reports wrong Amperage |
testSetting4: 21022 |
Used to correct the PWM Module ID 4, which suffers from a faulty REV identification and reports wrong Amperage |
Note: The above can change or be modified without notice!!!
table memory usage
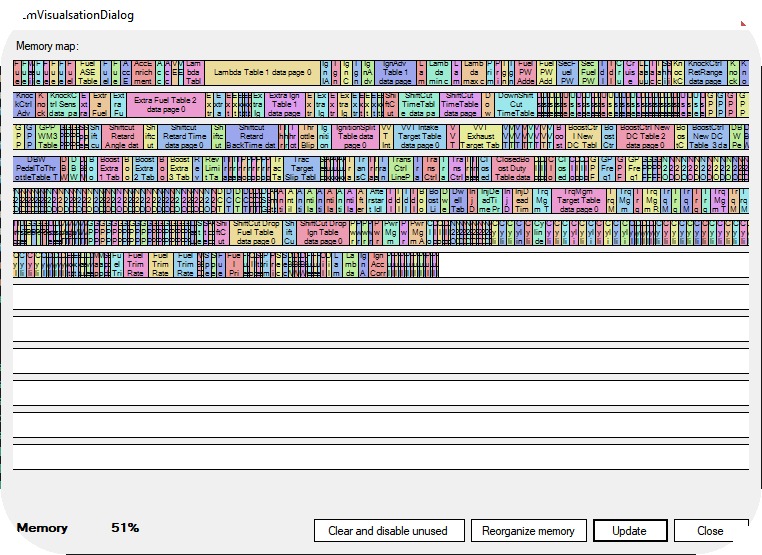
Reorganize memory
Used to reorganize memory, to prevent fragmentation, see Memory almost full / fragmented.
Clear and disable unused
In the background there might be tables that are filled with data (and uses available memory) but are not enabled, pressing this button will clear all not enabled table data to save memory.
Note: Always take a backup of your tune file before using this feature.