Overview
MaxxECU User Scripting lets you write custom logic in Lua to extend your ECU's capabilities. You can read and send CAN messages, control outputs, feed virtual sensor values, and build complex automation - all from scripts that run directly on the ECU.
Note: requires the MaxxECU GEN2 hardware, user scripting is not available on the GEN1 units: MaxxECU MINI, MaxxECU STREET, MaxxECU SPORT, MaxxECU RACE, MaxxECU RACE H20, MaxxECU PRO).
What can you do with User Scripts?
•Decode and transmit CAN messages (OEM sensor integration, custom dashboards, CAN-based accessories).
•Create virtual analog and digital inputs from CAN data or calculated values.
•Drive outputs with on/off or variable PWM control.
•Publish custom real-time values visible in MTune logging.
•Implement timed logic, state machines, toggle behaviors, and interlocks.
The Script Editor in MTune
MTune includes a built-in Lua editor with autocomplete and syntax checking. Advanced --> User Scripts --> Script Code.
The editor provides three main actions:
•Save - Stores the script on the ECU. The script is not compiled or executed; it is only saved for later deployment.
•Deploy - Saves the script and immediately compiles and runs it on the ECU.
•Monitor - Opens a live window that displays runtime errors and any output from print() calls. Use this for debugging.
Script Slots and Execution Model
The ECU provides 4 independent script slots. Each slot runs on its own thread, separate from the main ECU control loop.
•A script cannot block the regular ECU functions (injection, ignition, etc.). The ECU engine management always has priority.
•If your script runs a continuous loop (which is normal and expected), include a yield() or time.delay() call inside the loop. This lets the ECU share processing time between your scripts and its own tasks.
•All four slots execute in parallel, so you can split unrelated tasks across different slots for clarity.
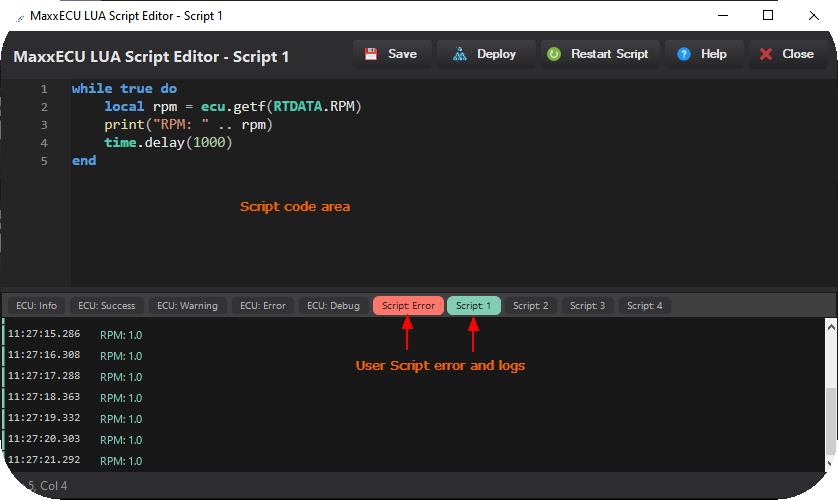
Your first Script (Hello world: print engine RPM once per second)
Open MTune, navigate to Advanced --> User Scripts, Script code, and select User Script 1.
1. Enter the code into the script editor.
while true do
local rpm = ecu.getf(RTDATA.RPM)
print("RPM: " .. rpm)
time.delay(1000)
end

MTune LUA Script Editor showing the hello world example code.
2. Click deploy button and check the script error and Script 1 log monitor, you should see the current engine RPM value being printed every second.
Let's break it down:
1.while true do ... end - An infinite loop. This is the standard pattern for scripts that need to run continuously.
2.ecu.getf(RTDATA.RPM) - Reads the current RPM as a floating-point value with proper unit scaling.
3.print(...) - Sends text to the Monitor window. Useful for debugging.
4.time.delay(1000) - Pauses for 1000 ms (1 second) and yields control back to the ECU so other work can proceed.
Important information
GEN2 User Scripts (Lua) use the standard Lua numeric types, supporting both integer and floating-point values internally. Scripts can perform full 32-bit bitwise operations, providing the same behavior as standard 32-bit Lua implementations.
Always yield in loops. Any while true loop should contain at least one yield() or time.delay() call. Without it, your script will consume all available CPU time for its thread, which reduces the time available for other scripts.
Execution and loop frequency
Lua runs in the low-priority superloop. The speed of this is logged as CPU loop freq. This is on average 2-3khz. Some heavy non-lua ECU tasks could occasionally take up to 2ms (a few times per second). So each Lua script will get executed every 0.3-2ms.
No yield/delay -> wastes CPU time. The script will autoyield in about 1ms to run other tasks. This will, on average, pull down the Loop Freq a lot, giving less time for other tasks.
Yield in a loop -> Will hand back control to the task loop. Comes back to the Lua script in 0.3 to 2ms.
Handing over control with yield will happen even if you don't command it. Using yield will allow you to time it where it's best for your script.
Good practice:
while true do
-- do work
yield()
end
Bad practice:
while true do
-- do work (no yield or delay!)
end
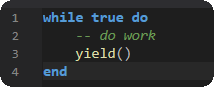
Good practice, yields every iteration.
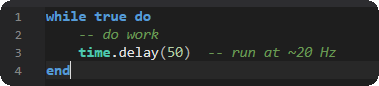
Good practice, delays give a natural yield.
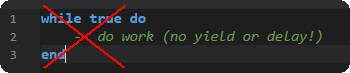
AVOID: no yield or time delay, will starves other work.
Use the Monitor window.
When something doesn't work, print() is your best friend. Print values, states, and CAN frame contents to understand what your script is doing.
Start simple.
Get a minimal version working first, then add complexity.
LUA basics
We here cover the essentials of Lua you need to write MaxxECU scripts. If you've written any code before (Arduino, Python, C, JavaScript) you'll pick this up quickly.
If you haven't, don't worry - Lua is one of the simplest programming languages out there.
MaxxECU uses Lua 5.5.
Learn Lua - Recommended Resources
If you want a proper tutorial beyond this quick-start, these are excellent:
•Learn Lua in 15 Minutes - A fast, example-driven walkthrough. Great if you already know another language.
•Programming in Lua (official book, 1st ed. free online) - The authoritative guide by Lua's creators. Thorough and well-written.
•Lua 5.4 Reference Manual - The full language reference. Useful when you need exact details. (5.4 docs are the closest publicly available reference to 5.5.)
•Lua Users Tutorial - Community-maintained tutorial with practical examples.
Comments

"-- CAN sensor reader with big/little endian parsing and timeout", example comments, starts with "--".
Variables and Types
Lua variables are dynamically typed. You don't declare types - the value determines the type.
local count = 0 - integer number <-- normally the value "0" means not set, but not in LUA.
local temperature = 98.6 - floating-point number
local name = "MaxxECU" - string
local active = true - boolean (true / false)
local nothing = nil - nil means "no value"
Always use local for your variables. Variables without local become globals, which can cause unexpected interactions between scripts.
GOOD: local rpm = ecu.getf(RTDATA.RPM)
AVOID (creates a global, visible to other code in the same slot): rpm = ecu.getf(RTDATA.RPM)
Numbers
Lua 5.5 has both integers and floats. Arithmetic works as you'd expect:
local a = 10
local b = 3
print(a + b) - 13
print(a - b) - 7
print(a * b) - 30
print(a / b) - 3.3333... (float division)
print(a // b) - 3 (integer / floor division)
print(a % b) - 1 (remainder)
Bitwise Operations
Lua 5.5 has built-in bitwise operators. These are essential for CAN byte manipulation:
local byte = 0xAB
Operators
byte & 0x0F - AND: 0x0B
byte | 0x10 - OR: 0xBB
byte ~ 0xFF - XOR: 0x54
~byte - NOT: (inverts all bits)
byte << 4 - shift left: 0xAB0
byte >> 4 - shift right: 0x0A
Common patterns for CAN data
Extract a single bit (bit 3 = value 8):
local bit3 = (byte >> 3) & 1
Combine two bytes into a 16-bit value (big-endian):
local high = frame.data[0]
local low = frame.data[1]
local value = (high << 8) | low
Combine two bytes (little-endian):
local value = frame.data[0] | (frame.data[1] << 8)
Note: CAN frame "data[]" uses 0-based indexing (data[0] through data[7]) because it maps directly to CAN byte positions. Standard Lua tables use 1-based indexing.
Strings
local greeting = "Hello"
local target = "World"
Concatenation uses
print(greeting .. " " .. target) -- "Hello World"
Convert number to string:
print("RPM is " .. tostring(rpm))
String length:
print(#greeting) - 5
Format (like C sprintf):
local msg = string.format("Temp: %.1f °C", 95.3)
Conditionals
local temp = ecu.getf(RTDATA.COOLANT_TEMP)
if temp > 100 then
print("Overheating!")
elseif temp > 90 then
print("Getting warm")
else
print("Normal")
end
Comparison operators:
== - (equal)
~= - (not equal)
< - less than
> - greater than
<= - less than or equal
>= - greater than or equal
Logical operators: and, or, not.
if rpm > 3000 and tps > 50 then
-- high load
end
if not active then
-- inactive
end
Loops
While loop (most common in ECU scripts):
while true do
-- your main logic
yield()
end
For loop (counting):
for i = 0, 7 do
print("Byte " .. i .. " = " .. frame.data[i])
end
For loop with step:
for i = 10, 0, -1 do -- counts down from 10 to 0
print(i)
end
Functions
Define a function:
local function clamp(value, min_val, max_val)
if value < min_val then return min_val end
if value > max_val then return max_val end
return value
end
Call it:
local duty = clamp(calculated_duty, 0, 100)
Functions can return multiple values:
local function parse_16bit(data, offset)
local high = data[offset]
local low = data[offset + 1]
return (high << 8) | low
end
local value1, value2 = parse_16bit(frame.data, 0), parse_16bit(frame.data, 2)
Tables
Tables are Lua's only data structure. They work as both arrays and dictionaries.
Array-style (indices start at 1 in standard Lua):
local data = {0x01, 0x02, 0x03, 0xFF}
print(data[1]) - 0x01
print(#data) - 4 (length)
Dictionary-style:
local config = {
threshold = 85.0,
hysteresis = 5.0,
fan_pin = 3,
}
print(config.threshold) - 85.0
Add / Modify
config.max_duty = 100
config.threshold = 90.0
Standard Libraries Available
MaxxECU scripts include these standard Lua libraries:
Library |
Description |
Reference |
Global functions (`print`, `tostring`, etc.) |
||
table |
Table manipulation (`insert`, `sort`, etc.) |
|
string |
String operations (`format`, `find`, etc.) |
|
Math functions (`abs`, `floor`, `sin`, etc.) |
||
coroutine |
Coroutine control (used internally by yield) |
|
Output to the Monitor window |
These are standard Lua and work exactly as documented in the Lua reference manual. The ECU does not include: "io", "os", "debug", or "package" libraries - you won't need them.
Common Patterns in ECU Scripts
Main Loop with Timed Execution:
local last_run = time.now()
while true do
if time.since(last_run) >= 100 then -- run every 100 ms
last_run = time.now()
-- your periodic logic here
end
yield()
end
State Toggle (Momentary-to-Latching):
local state = false
local prev_button = false
while true do
local button = (some_input == 1)
-- Toggle on rising edge
if button and not prev_button then
state = not state
end
prev_button = button
yield()
end
Value Clamping and Mapping:
local function map_range(x, in_min, in_max, out_min, out_max)
local clamped = math.max(in_min, math.min(in_max, x))
return out_min + (clamped - in_min) * (out_max - out_min) / (in_max - in_min)
end
Map coolant temp 80–110°C to fan duty 0–100%:
local duty = map_range(coolant_temp, 80, 110, 0, 100)
For more information about the MaxxECU user scripts, see User Scripts (LUA), or directly reference the LUA api reference and LUA examples. For more all available LUA settings and options, see Script Code, Script Input Control, Output Functions and Script RT values.